Welcome to the Workshop

Welcome to the Workshop

Wednesday, April 30, 2014

Little Passports

You know those really annoying Facebook ads which pop up in your feed? They drive me crazy.
But recently I saw one which led to something worthwhile and interesting.
It led me to Little Passports.

A friend and I have spent the past year searching high and low for good books for kids about other countries and cultures and travel. Nothing stodgy or dry, but fun and interesting and invigorating.

No deal.

(Note: We've since discovered the Lonely Planet Not For Parents books which are awesome, you can buy them here.)

So when I clicked over here to Little Passports I was a little excited.

"Your child's ticket to an exciting global adventure"?!
It sounded too good to be true but I decided to roll the dice and pay for a year's worth of global adventures.
And they're big dice, it cost me 150 big ones but signing up for the year was the best value for money.

And then I waited for the first package to arrive...

Within a month Poppet had received (always mailed in her name which she loves) her suitcase and passport, and a gorgeous world map. She was ready to travel with Sam and Sofia, her online buddies who write to her.

Each month she receives a padded parcel with a country stamp on the front. So far she's 'been' to Brazil, Australia, Egypt, Japan and France.  Each parcel contains a stamp for her passport, a pin for her map, some great activities and worksheets and best of all, a souvenir! Her favourite so far is the chunk of amethyst from Brazil. Or is it the origami from Japan. Or the Egyptian Mummy...
She also receives a 'boarding pass' and can go online and sign-in to play more games and activities for each country.

Here are some photos of her enjoying the Egyptian tour.


She even got to work on her archaeology skills to excavate that Mummy from a pyramid. God, how I wish I could have had Little Passports when I was 9!

Poppet has so much fun and it's a great activity for us to do together. Why wait for dry old Geography classes to start exploring the world. Rivers, oceans, flora and fauna. So much to discover.

Little Passports.

Worth every darn penny!


PS. Of course this is an independent review, I don't have that kind of blog.

Tuesday, April 22, 2014

There's a Hole in My Bucket....

Or should I say there are a bazillion holes in my house at the moment.

She's certainly looking rough, and an enormous hole is about to be dug in the basement. We're replacing all of the 100 year old clay drains. By the time we're done with this baby she'll have brand new plumbing, wiring, heating and hot water. It's been stressful spending the extra cash (and finding it!) but we know we'll be so relieved not to be destroying renos later to do the work.
Now is the time...


At least some of the walls have been framed and some repairs have been completed.
We have to be patient through the rest of the demo this week and focus on the excitement ahead. I can't wait for the drywall to start going up.
More soon.


Tuesday, April 15, 2014

Demolition Baby!

Just thought you'd like to see some of the demo photos.
Look how much sunshine flows in when the kitchen wall is gone!


There's some structural stuff to be dealt with here before the studs can come out. Dodgy renos from way back have caused some sagging. So glad the contractor picked up on this. This wasn't a supporting wall but it kind of is now until the repairs are done. Yeesh, dodgy DIY begone!
The broken tiles on the fireplace have come off, all ready for some shiny new ones. The mantle will get a lick of paint too...


And our basement has been turned to rubble. Lots of things will be happening down there, including a replacement of the heating and hot water systems. A new bathroom and sealing the place up from the cockroaches!


Our builder is funny, making some art of the roach. He was horrified at the size of this one (it is big for Canada) and we weren't impressed. Still, we shall kill them all. For sure!
Here is the room upstairs without the kitchen in it. The floor has to be replaced once the damaged joist has been repaired.


And here's a snap of me amidst the rubble in our back yard. It's gone now. Our guys are so quick and clean. Another reason why we're happy we chose this contractor.


That's all for now. I'm meeting the tiler today and the electrician starts tomorrow. Will be wonderful to have all that dodgy old wiring replaced. We're going to make this house safe safe safe!
And then we'll make it gorgeous gorgeous gorgeous.
But safety first.


Sunday, April 13, 2014

Free Easter Flag Tutorial


Yes, that's right. I've made a cute tutorial for you.
And just in the nick of time. Is that the Easter Bunny I can hear hopping towards us?!
It's a very quick and simple little project, and certainly easy enough for kids to manage.
With a little help from you, of course.

Here is a picture of the finished Bunny Flag.


What You'll Need

A scrap of Easter-y fabric approx 20cm square
Some felt bits and pieces, just enough to make a sweet little Bunny face.
A piece of ribbon or twine, approx 20cm long
Felt or craft glue, tweezers
Sharp scissors (some shearing scissors {pinking shears} if you have any for the 'fancy' edges)
Needle and thread (or sewing machine if you prefer)
Embroidery needle
Embroidery floss (to match your bunny)
Pipe cleaner (optional)

What You'll Do

  • Save the pattern (below) to your computer then print it off. Cut the paper pattern shapes out, or trace them onto card first if you want to re-use them.


  • Trace the bunny shapes onto your felt and cut them out. This can be fiddly so smaller scissors are best. A chalk pencil works well on darker colours and a washable fabric marker on the lighter pieces.


  • Glue the tiny felt pieces in place onto the Bunny's head shape. It can help to apply the glue with a cotton bud (Q-tip) and hold the little bits with tweezers. Allow to dry.


  • Meanwhile trace the flag shape onto your fabric scrap and cut out.


  •  Using your embroidery needle and thread stitch a little face on your Bunny. I like to do a simple cross stitch for eyes and a running stitch for the mouth. I also cut out tiny felt circles for cheeks and stitched them on with a cross stitch. (see the pattern diagram for placement)
  • Next fold over the top of your flag and stitch across the top of the flag, leaving a large enough casing gap for your ribbon or twine to be threaded through. You can easily do this by hand if you like. I used pinking shears to cut the edges, that way they are less likely to fray. And it looks way cuter, don't you think?


  •  Now thread your embroidery needle with the colour floss you think best suits your Bunny's head shape and use tiny stitches to sew it onto your flag (see the pattern diagram for placement). Stitch the bowtie on next, using the same technique.


  • You're almost there! Now it's time to hang your flag. Secure one end of your ribbon or twine with a small safety pin, then thread the pin through from one side of the casing to the other. Gently pull the ribbon through until an equal amount protrudes on each side.


  • Tie a knot or bow in the end of your ribbon to secure it. You'll notice it's a little floppy and doesn't hang very nicely. This is where I have trimmed a piece of  pipe cleaner to fit the size of the casing. 
  • Just pop it in next to your ribbon and use a little craft glue at the edges to keep it in place.
 

  •  Et voila! It's done. Hang it somewhere sunny as part of your Easter celebrations or give it to a special someone. If you have time why not stitch lots of little flags and string them along to make bunting. I wish I had time, but as you know, I'm renovating...


What do you think?
Feedback, feedback, feedback! I'd love to hear your thoughts...
If you manage to make your own Easter Flag please send me a photo. Either link it below or post it to my Facebook page.

Happy Easter to you and yours!


Monday, April 7, 2014

In which we bought a house!

I know I know, I've been quiet. Again.
This time we were truly busy.

House hunting.

We decided it was time to get on with our plan to settle in Canada so we sold our Australian home (so quickly and smoothly, yay!) before Christmas.

Purchasing a home in Toronto is an extremely intimidating business, bidding wars and too many buyers. This market is hot! So it was certainly with trepidation and an expectation of months and months of searching to no avail that we got started.

We found a buying agent via word of mouth (always the best way) and he's just fabulous. He patiently took us through lots of houses we had no intention of buying, simply to help us understand the quirks of Toronto properties. Oh, the quirks! Most houses in the downtown core are at least 100 years old, and most "renovations" have either been done by DIY-ers (including the electricity! scary) or home-flippers.

Dodgy dodgy dodgy.

What we wanted was a home in almost original condition which we could renovate PROPERLY ourselves and surprisingly we found it one month into our search.


This super-hot market means that there are often 8 or 9 buyers. Houses are listed on a Monday or Tuesday, agents view them on a Friday, and prospective purchasers over the weekend. Those who are interested in trying to nab the house need to decide by Tuesday, as that's the only time offers will be accepted.
No one knows how much other purchasers will bid for the house, nor are they told at any stage in the process how much the other offers are. Super secretive and certainly in the Seller's best interest.
And so bidding wars ensue. In fact, they are so common now that eyebrows are rarely raised.

Most recently (just as we were entering the market) the bidding went a little nuts.
We went to see a nice house in an up-and-coming hood and considered putting an offer on it. Until we learned there were more than 30 bids on the table. Utter madness, we walked.
That house ended up selling for more than $200000 over asking. You can read more about it here.

Another house in our hood (probably the most desirable one in the current market) was a complete gut job and it sold for $800000 and will require at least $250000 in renovations. Probably it's still worth it in this neighbourhood but that's certainly more than we wanted to spend.

And so we decided that the only way we were likely to secure a house within the next six months would be to look for the 'ugly' house, the unstaged one or the one on a tricky street.
And that's just what we did.


We bought a place on a main road, but it's the one part of said road which narrows to two lanes. There's a bus which runs up and down it but otherwise it's a great spot. We are within walking distance to our current neighbourhood, but also super close to a few others we love to frequent. The subway and streetcar routes are all nearby, we have parking and a cute backyard. That tree, my friends, is a granny smith apple tree with a delicious graft. You have to love buying a house from Italian stock, lots of fun things like apple trees and miles and miles of concrete under that snow!


We sent our agent off with our bid, expecting a call from him hours later asking us to increase our bid only to lose the property at the end of it. There were still 7 offers on this place, busy street and all, it's that kind of market. Instead we received a call less than an hour in to the bidding process to say we'd got it.


Honestly, it took a week for that information to sink in. Totally poleaxed.
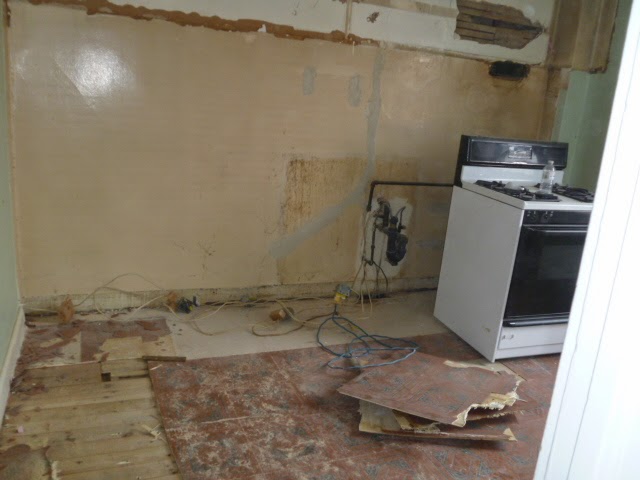
So here are some more photos of our funny little house.


We've spent the past month or so wading the craziness of building permits and builders' quotes but the wounds from that experience are still too raw for me to write about just yet. The good news is that the demo should commence shortly and I'll have lots of fun photos to share.


Yes, that's ANOTHER kitchen upstairs. Very common in this city, can't wait for the sledge hammer to swing in this room!
Our budget doesn't stretch to re-doing the bathroom which was recently 'updated'. So we're hitting it with as much paint as we can manage. Phase one of that process is getting close to completion. Will do a post about it soon, but here's a good before shot...


What's not to love?! The pale salmon-coloured tiles, the broken shower fixture, the timber cabinets. Ooh, and the nipple light! There's a few of these crazy ceiling fixtures in the house and they are soon to be gone, baby.
Gone!

That's all for now. Just wanted to formally start blogging about the housey-house.
I'm finally feeling excited about the renos. Trying not to thinking about the money slipping through our fingers, as it will begin to cascade soon enough. We are employing professionals to do the work on this house. But we'll do the painting. And that's going to take aeons. Lucky we like painting. No doubt I'll be cursing that statement soon enough.

To distract myself from the decision-making stress I've been having way too much fun on Pinterest and buying lashings of paint. Click over here if you want to check out any of my Pinterest boards regarding the house. There's a bunch of them.
Naturally.

Gotta go play Labyrinth with my kid. Do you have that game? We love it (thanks to Aunty Lindsay for buying it for Poppet's birthday). You can check it out here.


LinkWithin

Related Posts Plugin for WordPress, Blogger...